Last update: November 2017
This page describes a solution / workaround I've found for my wife to run again, even if she is an amputee with Chopart's amputation.
Legal:
- THIS SITE DOES NOT PROVIDE MEDICAL ADVICE. It is intended for general informational purposes only and does not address individual circumstances. It is not a substitute for professional medical advice, diagnosis or treatment and should not be relied on to make decisions about your health. Never ignore professional medical advice in seeking treatment because of something you have read on this website. If you think you may have a medical emergency, dial 911.
- This site does not recommend or endorse any specific tests, physicians, products, procedures, opinions or other information that may be mentioned on this website. Reliance on any information appearing on this website is solely at your own risk.
- The author of this page is a scientist, not a medical doctor, who shares a personal experience. As a consequence, this page is not a medical procedure with medical approval. Reproduce any part of this experience is at your own risk and the author cannot be hold responsible for any injuries you may experience.
- Seek professional medical advises before trying anything.
- This page contains medical images that might shock minors.
Advises:
- The most important advise I can give you before starting is… TAKE YOUR TIME! I know that your doctor (MD) probably told you that you would certainly never run again, and that this page may give you a little bit of hope, but do not rush. Things take time, particularly your body that needs to adapt. So no rush, take things slowly, safely, and once step at a time.
- As a consequence of the previous point, my second advise is to listen carefully to your body, and to observe it. Everything described below will be something new for your body, and it will react to it. Your body will send you very important signals, mainly warnings, so you observe it and try to feel how your body reacts to this new experience.
I am going to describe everything as it happened chronologically in order to explain what we did, when and why.
Please, do not hesitate to contact me if you have questions, suggestions, ideas of improvements, etc. at: guillaume at thibault dot b i z
1 - Context
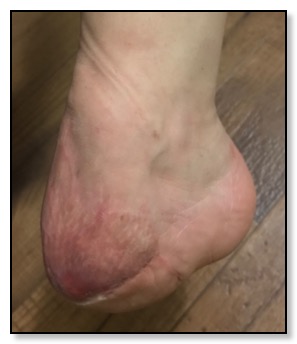
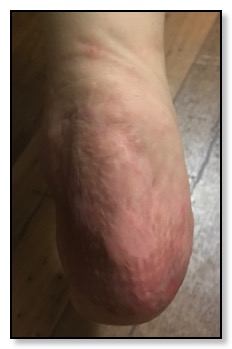
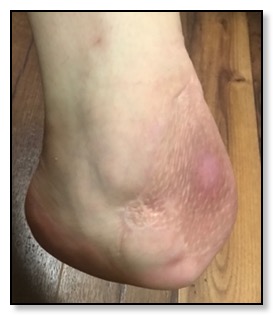
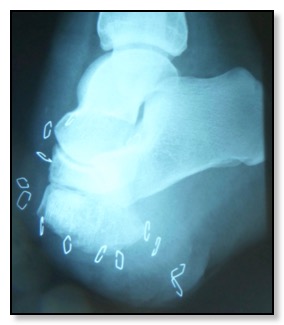
My wife was involved in a car accident in June 2013, and her foot was partially amputated: all the first metatarsi are cut. See images and the X-ray below.
After many surgeries, she got a skin graft. Three months after the accident (September), she could start to put some pressure on her heel again. She got her first prosthetic on October 2016, then a second on May 2014.
2 - Preliminaries: Wait and Get in Shape
During at least the first two years, the stump evolves a lot and the skin from the graft is really fragile. As a consequence, you must wait for the skin to be strong enough to resist to frictions, pressures, etc. My wife had to wait three years, and it is on October 2016 (3 years ans 4 months after the accident) that we finally started what I am going to describe below.
Before to go further, you must start to work out in order to get in shape. Your body is probably not used to do cardio trainings anymore, so unless you've kept working out weekly, it's more than likely that your body is not in good physical conditions. Moreover, the shoes used in this experience are as heavy as roller blades or skiing shoes, so much heavier than regular runnings.
Ergo… start to work out weekly at least two months before to start! Do some biking and elliptic biking, it will train your heart and strengthen your legs muscles. For the elliptic biking, try to do it (if possible) with just socks in order to get use to the clothes friction on the skin and the pressure on your foot without your walking prosthetic.
Don't forget to work out on the upper parts of your body, do not focus only on your legs.
Warning / Caution: As your doctor probably told you, one of the issues that may occur after the amputation are adhesions: the skin sticks to the bones and do not move anymore (or barely). If it happens, you have to massage the skin to get the mobility back, it will help a lot to reduce potential blisters and other skin injuries.
3 - Buy the Equipment
In order to have my wife run again, I had the idea to use these shoes: Kangoo Jump. They were created for people with joints injuries (ankle and knee), and they may reduce up to 80% the shocks. In these shoes, the ankle is almost completely blocked, so the ankle does not have to work and its lack of action is compensated by the spring. It's exactly what we need for a Lisfranc / Chopart 's amputation.
I contacted the seller by email and they advised me with the most appropriate shoes for my wife according to her size/weight.
From her prosthetic maker, my wife got this really useful partial foot:
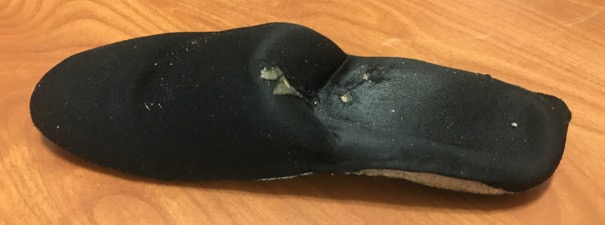
When walking in classical shoes without a prosthetic, this partial foot prevent the stump from moving forward in the shoe. It has a rigid sole, highly firm foam on the front to block the stump from moving and a thin layer of memory foam on the back where the stump pushes.
Optional: you will (more than likely) need silicon pads to protect fragile / painful surfaces of your stump. We first bought these little ones, but finally we found the big one more convenient and adapted to the surface to protect.
4 - Let's get started
First, if you have the partial foot presented above, place it in the Kangoo Jump, else use whatever clothes, socks, firm foam, etc. to fill the front of the Kangoo Jump, and then prevent the stump from drifting forward.
Second, place the silicon pad(s) where you usually get injured or to protect painful surfaces.
Advises:
- Before to run, get use to walk with the shoes. The spring blades underneath the shoes are curved, there is no flat surface like on regular runnings, so you will need to get used to it and find your balance. Ask someone to hold your hand at the beginning until you feel completely confortable. Moreover, you will certainly discover painful areas, so you will have to learn how to place the silicon pads accordingly.
- Do the first run on a treadmill in a fitness center. The surface is flat and regular, and the speed steady and adjustable, so it will ease the learning process and the first strides.
- Do not forget to warm up! Start walking first.
- Put a little steep (1 or 2 %). When you run, you have to lean, so adding a little steep simulates this, it let's you keep your body vertical, and it gives you a little bit more control until you feel confortable enough to run without it.
- At the beginning, do not try to run more than few minutes, and do not run more than twice a week. Remember the advises above: take it easy and slowly, listen to your body.
Here are two videos of my wife during only the 6th training: video 1 and video 2
Advises:
- While running, check if the spring blades touch horizontally on the treadmill, so check that there is not a side (inner or outer) that would touch first. If it happens, correct the way you run as soon as possible, because it means that your ankles / knees are not working vertically and then are twisted.
- While running, look at the heaps, or more practical look at the horizontal line made by the top of your short / pant. You will see that on the healthy/normal side, the heap stay at the same height, when on the amputated side the heap tends to "fall" at the end of the stride. Why? At the end of the stride, the toes of the normal foot push and give the impulsion to move forward. Impulsion that is transmitted up to the heap that stay at the same height. However, on the amputated side, the toes are missing then do not push, so the impulsion is missing. The bigger this fall, the more imbalanced the way you run. It should get better when you will get confortable with the shoes and when you will have built your muscle back.
- Check the foot after each training. Look for rashes/injuries, they will indicate where to place the silicon pads and if a little break during the training is necessary.
5 - Improvements
The main problem while running is that the amputated / partial foot moves inside the shoe. Without the front foot tighten inside the shoe, the heel tends to move vertically at each step, and it also tends to move horizontally to press the outer part of the shoe. This creates inconfort and you focus on stabilizing your run instead of moving forward. So the amputated foot needs to be immobilized inside the shoe, and my idea was to use termo-formable foam. Once shaped to fit around your foot, the term-formable foam will fill all the gaps between the amputated foot and the shoe.
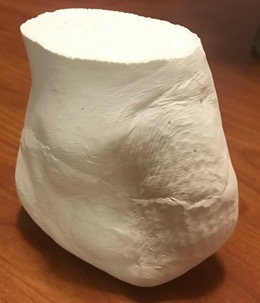
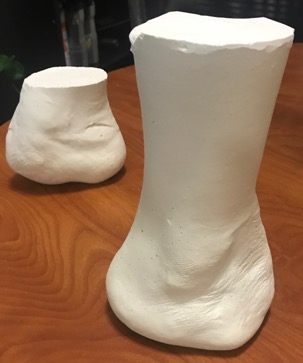
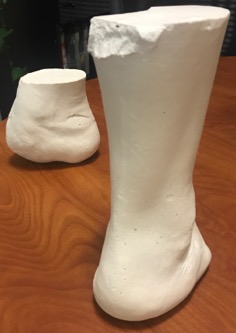
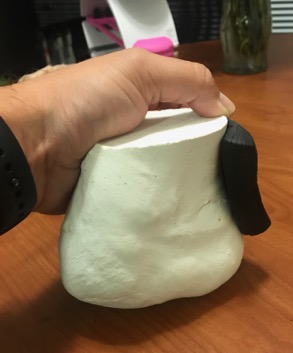
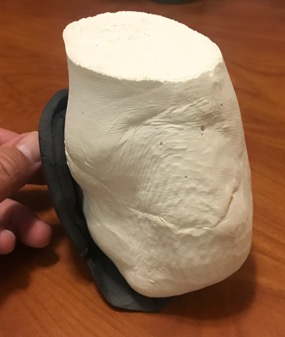
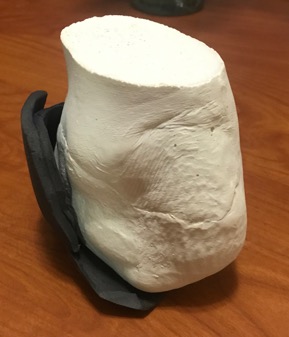
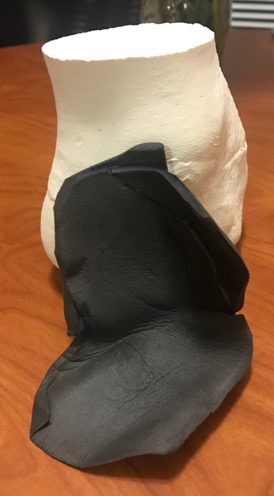
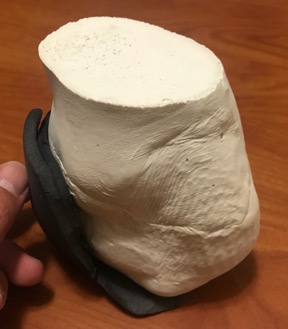
The first obstacle is that you cannot term-form the foam directly on the foot for a really obvious reason: you will get badly burnt! So I decided to create molds using alginate (buy a good one, hypoallergenic) and plaster. I put the alginate preparation into a bucket (or a metallic chimney pipe when I needed a higher mold), then my wife placed directly a foot inside. Here are the results:

Advises:
- You may want to make a test on a single finger or a small part of your body to make sure that your skin does not make a bad reaction with the product.
- Make different molds with the more or less pressure on the foot on the bottom of the bucket. It will show you the foot deformation, and the bones movements.
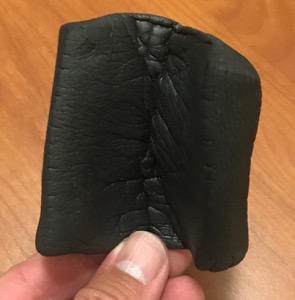
First, I bought Cross Linked Polyethylene - 2LB foam with 1" and 1/4" thicknesses. I used the 1" thickness to prevent the heel from moving vertically (up and down), by creating a block around the Achilles tendon. I cut a piece of foam and placed it in the oven for few minutes, and then I shaped it on the molt.
Advises:
- In my old and cheap oven, the ideal temperature was 235°C (460°F). You may have to adjust according to yours.
- When overheated, this foam releases particularly unpleasant smokes/fumes. Do not forget to ventilate the room.
- Do not use a heat gun. It only heats the surface, when you need the entire block to have the same temperature.
Here is the result:
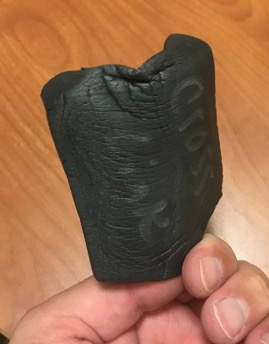
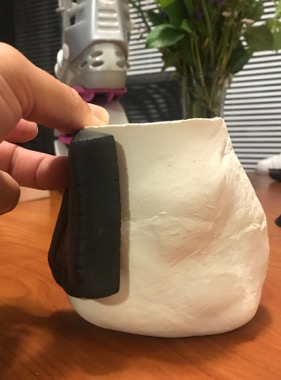
Second, I used the 1/4" foam to prevent the heel from moving horizontally (to the exterior part of the shoe). I cut two pieces that I glued together: one bigger piece that goes underneath the heel to alleviate the pressure and up to the malleolus to prevent the movement, and a second to increase the thickness and reduce the horizontal movement. See the results:
I also bought 5LB ViscoMAX medical Memory Foam. I cut thick slices of this foam with a hot wire, and we placed it all around the front of the foot to stop the last movements by filling the last gaps.
I hope the explanations are clear enough and it will help people.
Please, do not hesitate to contact me if you have questions, suggestions, ideas of improvements, etc. at: guillaume at thibault dot b i z
Here is an other solution I saw online: Bionic Boots
I contacted the maker, but I didn't get any answer.